
In this post, I walk through creating an Azure Stack HCI test lab (using MSLabs), in the process creating four (4) lab VMs: a pair of (2) Azure Stack HCI nodes, a WS 2022 domain controller, and a WS 2022 management server. Once these lab VMs are created, this environment can be used to test common Azure Stack HCI scenarios, including running guest VMs, setting up Kubernetes, using SQL MI, configuring Arc, and others.
Since there are a lot of steps involved to create the lab, I’m breaking this post into 3 parts:
~
Okay, let’s get started!
“Create an Azure Stack HCI environment from scratch, you say? That sounds a really LONG and arduous process!” 😂 Luckily Microsoft provides the perfect test-bed to get started: A tutorial that walks us through using MSLabs scripts (which is itself a small wonder) to create our own self-contained domain, complete with DC, management server(s), and HCI cluster node(s).
I’m going to build upon that tutorial, so it’s important to familiarize yourself with the above document from Microsoft.
~
1. Configure the lab
1.1 Prerequisites
- Follow along in Microsoft’s tutorial: Prerequisites
To run this lab, the only real hard requirement is to have a host server (or PC) that is running Hyper-V, supports nested virtualization, and has enough memory and disk I/O (SSDs) to run the VMs we will be creating.
Here’s what Microsoft suggests for your virtualization host, and what I used:
| Microsoft suggests… | I used… |
| Hyper-V host running Windows Server 2022 / 2019 / 2016 | I’m using Windows 11 Pro with the Hyper-V role added. (Win 10 Pro works too) |
| 8 GB RAM | We’ll need much more – 100 GB is a good starting point |
| CPU with nested virtualization | 👍 |
| Solid state drives (SSD) | This is a must – SATA SSDs, NVMe is even better. |
| 40 GB of free space | You’ll want much more if you want to do anything interesting with your cluster. I have a pair of 2TB SSDs dedicated for this exercise. |
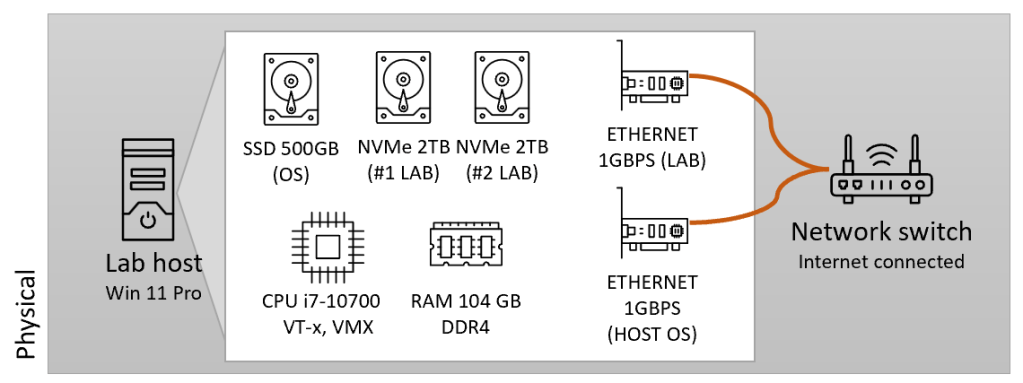
Here’s a visual diagram of my lab host (i.e. the physical layer of our lab):
~
1.2 Prepare the lab
1.2.1 Download software
- Follow along in Microsoft’s tutorial: Prepare the lab
We need to download a few key pieces of software:
If you have licenses/media for Azure Stack HCI/Windows Server, you can use what you already have. Otherwise, the links above allow you to access evaluation media.
| You won’t be charged for Azure Stack HCI yet – charges start 60 days after you register a cluster. Make sure to unregister your test cluster before that time to avoid getting charged. (I’ll explain how when we are on the registration step) |
~
1.2.2 Extract MSLabs and set up ‘Lab‘ folder
I created the folder structure, placed ISOs, and extracted MSLabs scripts in the same manner suggested on Microsoft’s tutorial document.
~
1.2.3 Edit the LabConfig.ps1 script
Here we are going to configure MSLabs scripts to create the kind of lab VMs that we need – specifically, by editing the specific powershell file LabConfig.ps1. Microsoft’s tutorial does a good job of walking through what configuration changes are needed, and LabConfig.ps1 itself has great examples and self-documentation, but to speed things up here is the configuration I used:
$LabConfig=@{ DomainAdminName='LabAdmin'; AdminPassword=''; Prefix = 'MSLab-' ; DCEdition='4'; Internet=$true ; AdditionalNetworksConfig=@(); VMs=@(); DHCPscope="172.16.1.0"; ServerISOFolder="C:\lab\isos" ; EnableGuestServiceInterface=$true ; UseHostDnsAsForwarder=$true}
#Azure Stack HCI
1..2 | ForEach-Object {$VMNames="AzSHCI"; $LABConfig.VMs += @{ VMName = "$VMNames$_" ; Configuration = 'Simple' ; ParentVHD = 'AzSHCI21H2_G2.vhdx'; SSDNumber = 0; SSDSize=800GB ; HDDNumber = 0; HDDSize= 4TB ; MemoryStartupBytes= 4GB }}
#Management Server
$LabConfig.VMs += @{ VMName = 'MgmtSvr' ; ParentVHD = 'Win2022_G2.vhdx'; MGMTNICs=2 ; MemoryStartupBytes= 2GB}
Here’s what I changed, mostly based on trial and error:
- I updated the
DHCPscoperange to better fit my environment - I changed the AzSHCI storage-related
Configurationfrom ‘S2D‘ to ‘Simple‘, and the correspondingHDDNumberto0(more on this later). - For my in-lab Management VM, I customized the name, and updated the
ParentVHDvalue to ‘Win2022_G2.vhdx‘ (to reflect my choice of Windows Server 2022).
~
2. Run MSLab scripts
Follow along in Microsoft’s tutorial: Run MSLab scripts and create parent disks
It’s time to run the MSLab scripts and provision the lab VMs. In this step, I followed the tutorial pretty closely without my own modifications.
A few pointers:
- Make sure your script execution policy is set to
Unrestrictedbefore you start. - I found that my Windows 11 right-click context menu didn’t offer a handy ‘run as administrator’ in the same way as other Windows versions – I ended up starting a PowerShell session as administrator and running the scripts from there.
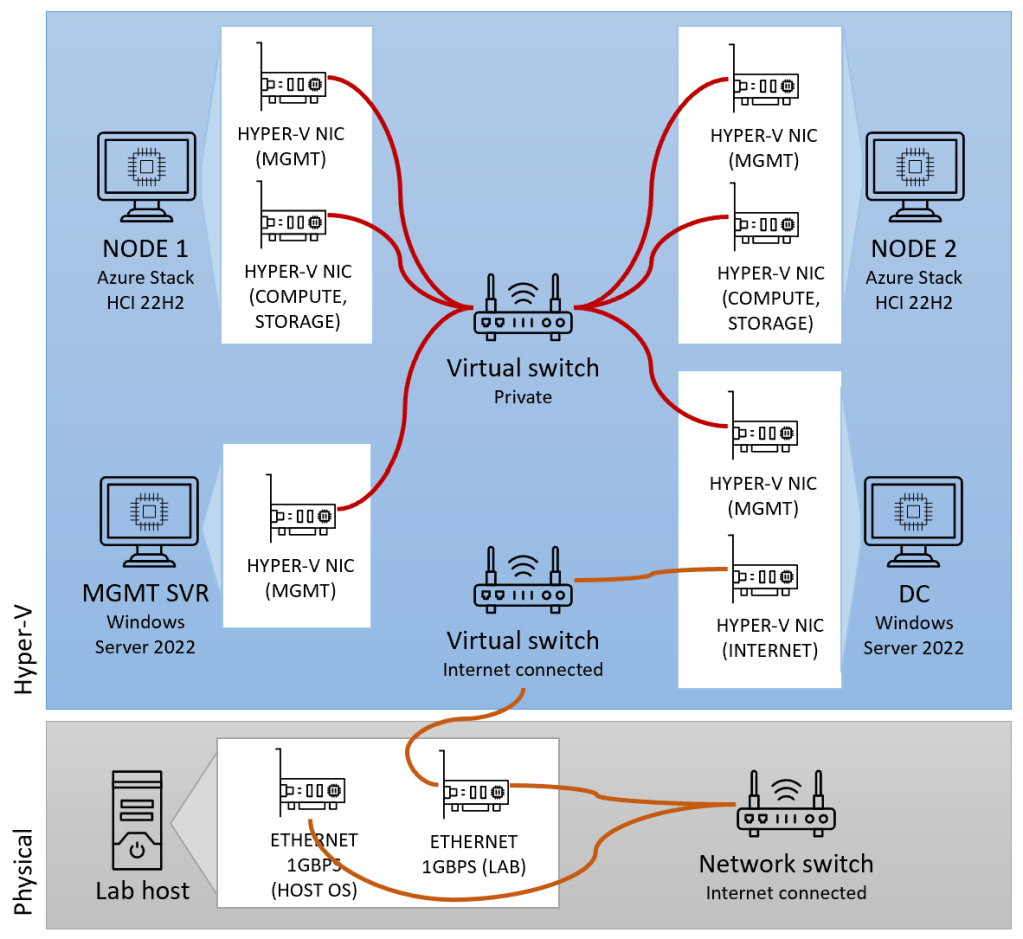
Here’s what the lab architecture will look like when done:
- Physical lab host with Hyper-V role (Lab host)
- Lab VM domain controller (DC)
- Lab VM management server (MGMT SVR)
- Lab VM Azure Stack HCI node #1 (NODE 1)
- Lab VM Azure Stack HCI node #2 (NODE 2)
- Virtual switch #1 (private – between lab VMs only)
- Virtual switch #2 (Internet-connected)
~
3. Install software and updates
Follow along in Microsoft’s tutorial: Install operating system updates and software
Now that the lab VMs have been created, we’re going to apply OS updates and install a few other features, including Windows Admin Center. I did a few things differently from the tutorial:
- I installed OS updates on all the lab VM’s at the same time (Azure Stack HCI nodes #1 and #2, domain controller, and management server).
- For Azure Stack HCI, I installed feature updates first (option 3), then quality updates.
- For Windows Server, I just kept running Windows Update until there was nothing left to install.
- I didn’t need to install Microsoft Edge on the lab Domain Controller since I’m using WS 2022 and it’s already installed.
- The tutorial calls for installing Windows Admin Center on a WS 2022 Server Core VM, but I used WS 2022 Desktop Experience (Full Server) for my lab VM management server. This simplified the installation quite a bit (browse to https://aka.ms/wacdownload, run the installer and follow all the default prompts).
- I skipped the Windows Admin Center external network adapter step, since I didn’t experience any connectivity or performance issues when using WAC interactively from the lab VM management server itself (versus connecting remotely to WAC from the lab host, another VM, or another PC).
- I didn’t register Windows Admin Center with Azure (for now).
~
Woohoo – we made it!
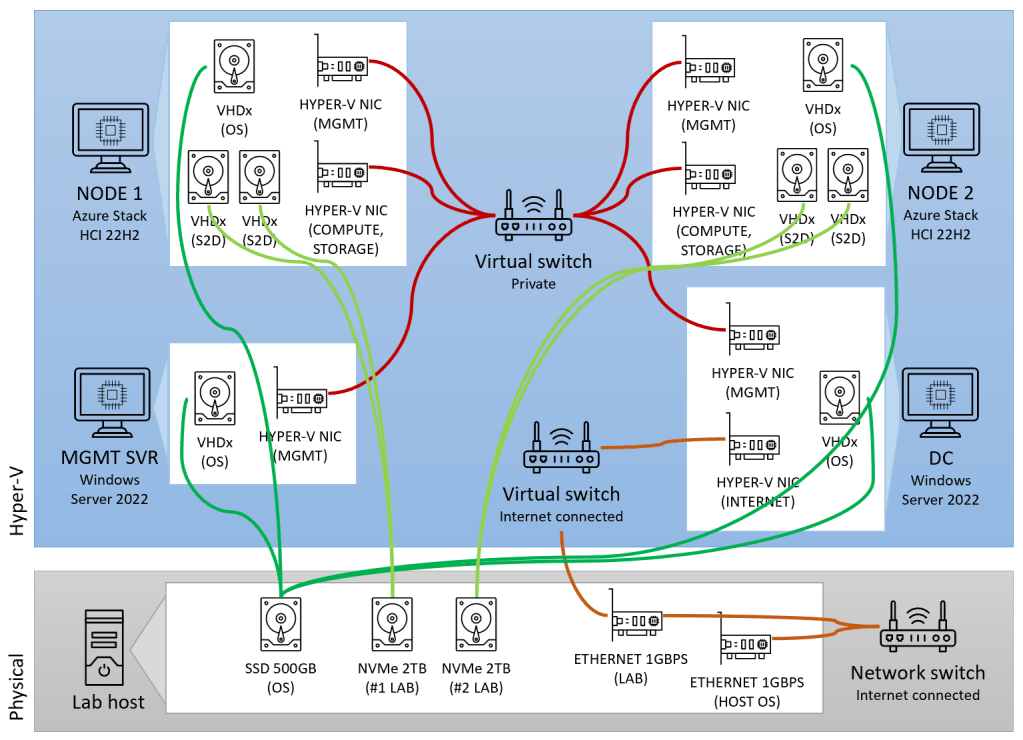
Here’s a more detailed diagram of our lab, showing:
- Lab host
- Virtual machines
- Virtual switches
- Virtual network routing between VMs, VSwitches, lab host, and physical switch
- Virtual storage (VHDXs) and their physical storage locations
In the next post, I’ll create an Azure Stack HCI cluster out of these lab VMs, walking through prerequisites, cluster creation wizard, registration, and validation. 😊

Leave a comment